When you’re short on time, you need quick and effective advice. That’s why we teamed up with a Technical Support Specialist to demonstrate just how easy it is to wire a relay in less than two minutes!
Essential Parts for Wiring a Relay
To successfully wire a relay, you’ll need the following components:
- 5-Pin Relay
- Primary Wire
- Push-On Terminals
- Ratchet Crimp Tool
- Wire Stripper
- Accessories (e.g., toggle switch, vehicle lighting)
- Optional: Relay Harness (for a cleaner installation and easier connections)
For a step-by-step visual guide, check out our video tutorial, where we demonstrate how to wire a standard 5-pin relay (Part #73980) using primary wire.
Why Use a Relay?
Relays are essential for automotive electrical systems because they:
- Allow low-current circuits to control high-current accessories like lighting and motors.
- Protect switches from excessive power loads.
- Enable automation of electrical components.
By incorporating a relay into your setup, you improve the longevity and performance of your vehicle’s electrical system.
Step-by-Step Guide to Wiring a Relay
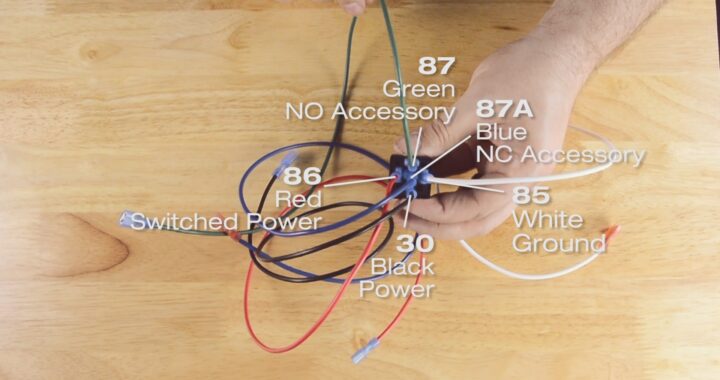
- Identify the Relay Pins:
- Pin 30: Connects to the power source (battery).
- Pin 85: Connects to ground.
- Pin 86: Connects to the switch.
- Pin 87: Connects to the powered accessory.
- Pin 87a (if applicable): Used for Normally Closed applications.
- Prepare the Wires:
- Strip the wire ends using a wire stripper.
- Crimp push-on terminals using a ratchet crimp tool.
- Connect the Wires to the Relay:
- Secure each wire to its respective terminal.
- Use a relay harness for an organized installation.
- Test the Connection:
- Toggle the switch to ensure the relay activates the accessory.
Learn More About Relay Wiring
Want to wire a toggle switch like in our demonstration? Check out our detailed Toggle Switch Wiring Guide.
For more expert advice and high-quality electrical components, visit Del City or call 1.800.654.4757 to speak with a specialist.