In a 12-volt DC environment (automotive, marine, trailer, auxiliary power, etc.) poor connections cause voltage drop, heat, corrosion, intermittent faults and early failure. For example: loose wire-to-terminal contact = higher resistance → more power loss → heat → oxidation → further degradation. A robust terminal solution reduces resistance, limits ingress of moisture/contaminants and resists vibration fatigue. Learn about how to get the best 12V electrical connection with heat shrink terminals
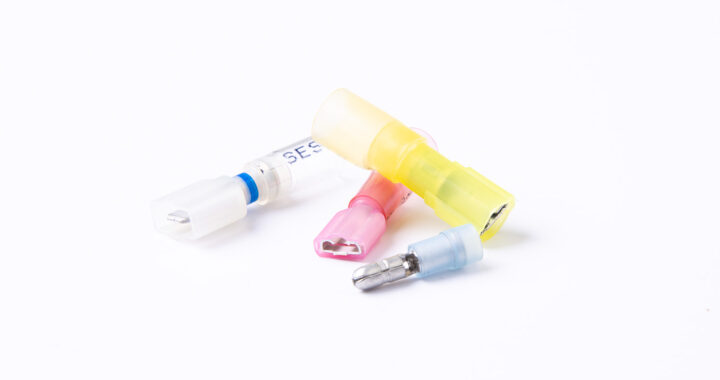
The three heat-shrink terminal construction types
Here’s a breakdown of each type, with pros/cons, and what makes them suitable (or not) for your application.
Heat-shrink + crimp only (no solder)
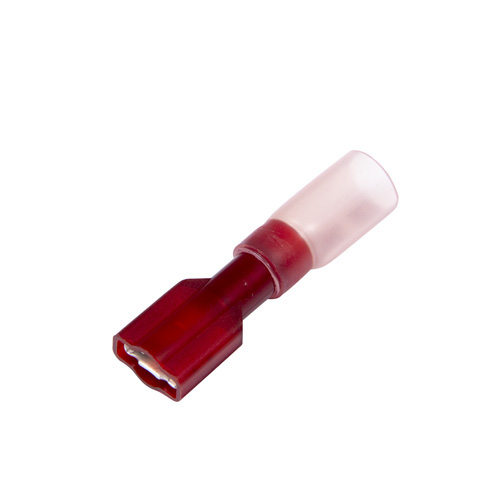
Example: NSPA Heat Shrink & Crimp Push-On Terminal Del City part number 964005
How it works: You insert stripped wire into the metal barrel, crimp the barrel, then slide the heat-shrink sleeve over the joint and apply heat. The sleeve shrinks and adhesive (if adhesive-lined) seals out moisture.
Pros to heat-shrink + crimp only
- Quick to install (crimp + heat).
- Good for moderate vibration and moisture if the heat-shrink has adhesive lining.
- Lower risk of overheating the wire compared to solder.
Cons to heat-shrink + crimp only
- Crimp connection is only as good as your tool and technique: poor crimp → higher resistance.
- Doesn’t add solder filler to the conductor so in marginal cases you rely entirely on metal barrel + crimp to maintain contact.
- If the heat-shrink fails or was not adhesive-lined, moisture ingress possible.
Best use case: Standard 12 V wiring in stable environments (e.g., interior wiring, protected harnesses) with moderate current, where installation speed matters and serviceability is acceptable.
Heat-shrink + solder (no crimp)
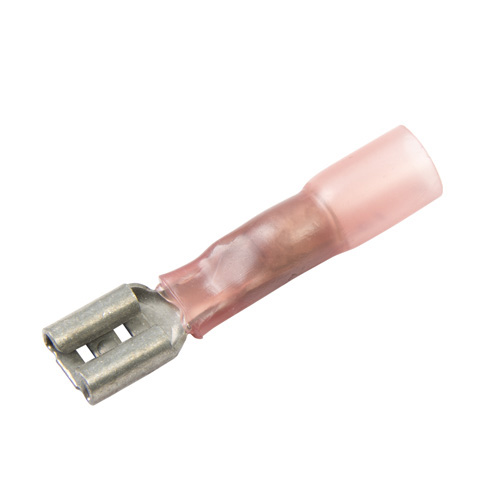
Example: NSPA Lead-Free Heat Shrink & Solder Push-On Terminal Del City part number 966815LF
How it works: Strip the wire, insert into solder sleeve inside the terminal, apply heat (melts solder, wires fuse/tin, heat-shrink activates). Then finish the heat-shrink seals.
Pros for heat-shrink + solder
- Solder provides virtually no mechanical play (once cooled), good conductor continuity, very low resistance.
- Heat-shrink seals out moisture so you get both electrical and environmental protection.
Cons for heat-shrink + solder
- Requires more skill and the correct tools (soldering or a controlled heat gun). Risk of overheating wire insulation or adjacent wiring.
- In vibration‐rich environments solder can become a “stress-point” because it rigidifies the wire, reducing flex; if the wire bundle moves, fatigue may initiate at the solder interface.
- Harder to repair or re-crimp after installation.
Best use case: Critical 12 V runs where minimal resistance is required (e.g., main battery feed, high current runs, long harness runs) and vibration is moderate and harness is well supported.
Heat-shrink + solder + crimp
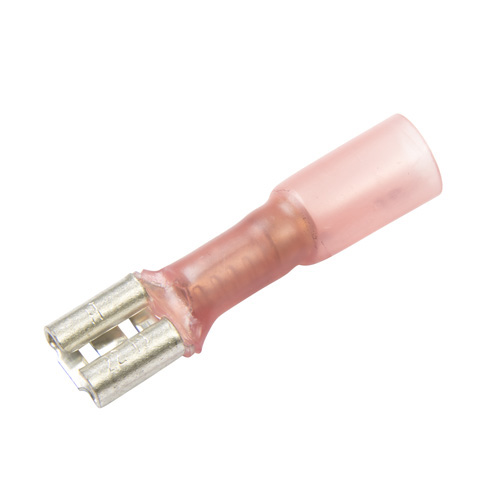
Example: NSPA Lead-Free Heat Shrink, Crimp, & Solder Push-On Terminal Del City part number 977815LF
How it works: The wire is stripped, inserted, crimped at the barrel, solder sleeve inside is melted, then heat-shrink is activated. So you get mechanical crimp + metallurgical solder joint + environmental seat via adhesive heat-shrink.
Pros for heat-shrink + solder + crimp
- Highest electrical continuity (crimp + solder) and strongest mechanical bond.
- Excellent environmental protection when heat-shrink is adhesive lined.
- Best suited for high current, harsh environments (moisture, salt, vibration).
Cons for heat-shrink +solder + crimp
- Most labor/time intensive.
- Requires correct sequence and tooling (strip → insert → crimp → heat solder → heat-shrink). Any misstep may compromise one part.
- Cost per connector is higher.
- If rework is required the process is more involved.
Best use case: Mission-critical 12 V wiring in harsh environments (marine, off-road, vehicle mains, RV battery systems) where failure cost is high and you have skilled installation.
Comparison summary (for 12 V wiring)
| Construction Type | Electrical Continuity | Mechanical Resistance | Environmental Seal (moisture) | Installation Complexity | Use Case |
|---|---|---|---|---|---|
| Heat-Shrink + Crimp | Good, depends on crimp quality | Good if crimp tool & method good | Moderate (depends on adhesive lining) | Low | General purpose 12 V wiring in benign environment |
| Heat-Shrink + Solder | Very high continuity (metal joint) | Good, but rigid → potential fatigue | High (if heat-shrink sealed) | Medium–High | Long runs, higher current, controlled environment |
| Heat-Shrink + Solder + Crimp | Top tier (redundant joint) | Very high mechanical integrity | Very high (best seal) | High | High-value wiring exposed to vibration, moisture, long life |
Practical Tips
- Use correct gauge match: For 12 V primary feeds (say 10-12 ga) you’ll want connectors rated for that gauge.
- Use a quality crimp tool when crimping. A ratcheting crimper ensures consistent force. Without it, a “good enough” crimp may introduce variable resistance.
- If using solder: avoid “heat soak” damage to insulation, and ensure the wire remains supported (strain relief) so you don’t create a fatigue point.
- Heat-shrink must fully recover and the adhesive must flow around the joint to seal. Lack of good heat shrink means moisture ingress, especially in engine bays or chassis grounds.
- For bundles with vibration or flex, consider avoiding purely soldered joints (without crimp) because the wire becomes rigid at the joint and may fatigue.
- For marine or salt-air, the combination method (crimp + solder + heat-shrink) is often the only recommended way to ensure long-term integrity.
- Label and inspect joints: Color code gauge, inspect heat-shrink shrinkage, and check that wires are fully entered into barrels (many Del City terminals are clear or translucent so you can visually check insertion. This is a clear push-on terminal version.)
Conclusion
To get the best electrical connection on 12-V wiring with Del City terminals: pick the construction that matches the environment, current, and risk profile. The heat-shrink only version offers a solid baseline. The solder-enhanced version boosts electrical continuity. The crimp + solder + heat-shrink gives you the most robust solution but at higher cost and complexity. When considering your project you can think of these as tiers of quality: standard, enhanced, premium. Match the tier to the circuit importance and exposure conditions.